There's a wrinkle in the fabric that no one noticed. Plus, they held up a water bottle that had a green label that has now been keyed out. These are times that cause some serious hair-pulling. The solution is to see the key when you shoot.
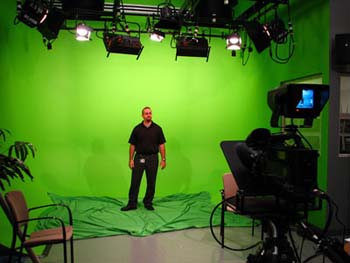
I've used my share of video mixers that offer chromakey and have found that they generally produce awful results -- ragged edges, odd halos, and then the green wall reflects off the talent and makes them look a little sick. Video mixers do not have the ability to subtly finesse a chromakey, if they do it at all. We just added a green cyclorama (seamless on three walls to the floor) to our studio for chromakeying purposes, so we welcomed the opportunity to try out [url=http://www.datavideo.us]Datavideo[/url]'s DVK-100 chroma keyer. It also does blue chromakey and a luma key (key out black). The real trick these days is producing a clean key without a lot of fussing on the background.
Admittedly, we are lucky to have a new cyc wall, but the raised floor of our studio wasn't painted green. We still have the green drape we used before we had the wall painted and we put that on the floor and found that the greens don't even match. This should be interesting.
Setup and initial testing
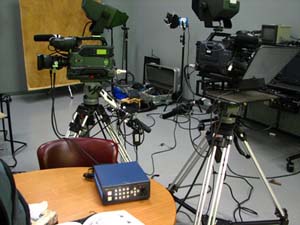 In testing the Datavideo chromakey system, we ran the Y/C output of a Sony DSR-370 DVCAM camcorder into the camera input of the DVK-100. Another camera supplied the background, but it could come from anywhere. The DVK-100 has composite and Y/C inputs for two different cameras and a third input for your background. This way, you can easily do two different keys without having to reposition cameras or swap a bunch of cables.
Although it doesn't have component input, few video cameras offer component output from the camera itself. There are no FireWire inputs, but we did not miss them because the DV signal that would pass over FireWire is chroma-reduced (4:1:1) and then compressed. We get uncompressed chroma at full resolution out of the camera's analog outputs. This makes for cleaner keying.
The instructions in the 30-page user guide are pretty well-written. For newbies, it covers everything down to the BNC to RCA adapters you need to connect to the video out of consumer gear. For those who have done live keying before, setup is quick, and the manual gives good explanations of how to fine-tune various parameters, such as using density to separate similar colors.
During testing we were able to get clean keys of both the wall and the fabric on the floor without too much trouble. We didn't even have to get all the wrinkles out of the fabric. Then we fine-tuned the key to eliminate a green edge on the left and a white edge on the right. The DVK-100 has an Edge Adjustment feature that allows you to shrink the keying edge to the actual edge of your talent. This cleaned up both sides of our key and we were looking good.
We tried a close-up shot and found the background put a green cast on the face of our talent. This is a typical problem and one that few, if any, video mixers could ever hope to touch. Fortunately, the DVK-100 has a Spill Adjustment that dialed that sickly green right out of the shot. Very sweet.
Making live keying adjustments
Lastly, our cyc is a little narrow, crammed into a corner of our studio. With a computer key this is not a problem because you can crop and reposition the keyed person later on in post. But with a live key, positioning talent in the upper right hand corner of the screen means you are pointing the camera down and to the left. Then a great portion of what the camera sees is not going to be perfect chroma green -- it will be floor, light stands, chairs, etc. The DVK-100 has the ability to manually adjust top, bottom, left, and right sides of the source so you can dial out anything outside of the active keying area.
 We used this capability for one effect. By moving the right edge of the key into the frame and matching it with a vertical element in the background, we were able to make it look like the talent was peeking out from something in the background -- all in real time.
This is what makes a little box like this so useful -- you can tweak and adjust your foreground, background, lighting, and all the variables and make sure you get the key you envision during the shoot while you can still make changes. It is so much harder to fix a bad key in post than it is to fix it while you are still shooting. The only feature the DVK-100 does not have is the ability to adjust the softness of the keying edge. In all our testing, I did not find the default setting to be problematic at all.
Buttons, LEDs, and inputs
If you do need to make an adjustment, simply touch a button for the setting you'd like to tweak, and then rotate the one knob on the DVK-100. The buttons are labeled, but there are more features than buttons, so many buttons have two functions. You access the secondary functions by holding a particular button down for two seconds until the button's red LED blinks to let you know the secondary function is active. The only drawback is that the secondary functions are listed only in the manual and not identified anywhere on the unit itself. Once you learn them, you can work quickly, but it would be better to have the secondary functions silkscreened on the face of the DVK-100 as well.
There is a bar of LEDs over the knob that lets you know how far you've adjusted that particular setting positively or negatively. Without these indicators, you could easily keep turning the dial in one direction waiting for something to happen. With the LEDs, you always know where you are in the adjustment and can go back in the other direction to implement the desired effect.
There are two camera inputs and one background input on the DVK-100. While this is not as useful as having two backgrounds, with one tied to each foreground, two inputs are better than one. You can frame two different shots with two different cameras and you don't have to spend time repositioning one camera, say, for two hosts. You can easily punch between the two cameras in the DVK-100, but you will have to manually switch the backgrounds on your own to match the change in foreground. If you have two cameras, this can easily be a time-saver.
The instruction manual notes that the settings for each of the two cameras are saved in non-volatile memory even when powered down. I would say that they'll have a lot of settings to fix when I return this unit, but they've even given it a handy Reset button so you can always start a new project clean if you want, or hold down the camera buttons and lock in the settings so they can't be messed with. Good features both.
Pre-viz
Even if you don't record the output of the DVK-100, it is a great previsualization tool. We felt the output was good enough to use for live events and record right to master tape. The second advantage is that you are keying with the full video output of the camera, not the undersampled color resolution of a compressed tape format. Lastly, there is no rendering or processing that has to happen later—if your key is clean, you'll have the finished video as soon as you complete your shoot. With the 12V power input, you can even use it in the field.
With an MSRP of around US$1,200, the DVK-100 is not for someone who seldom needs keying. But to save post time or for previsualization, and definitely for regular keying work, the DVK-100 is an excellent tool that can easily save your studio enough time and money to pay for itself over the long run.
Macsimum rating: 8 out of 10
Anthony Burokas of IEBA Communications, a self-confessed "gadget guy," has been an event videographer for more than 15 years. He has shot award-winning video internationally and is technical director for the PBS series' "Flavors of America."


